

Make your own leecloth out of recycled canvas.
After we purchased a new suit of sails recently, I was determined to give our old sails a second life. I couldn’t find a recycling program that accepted sailcloth, so I started looking for ways to put our bagged-out old sails to good use. To my great delight, I discovered dozens of weird and wonderful applications for old sailcloth: wine bags, kitty litter boxes, anchor riding sails . . . My fiance, Robin, even suggested I make a sailcloth wedding dress. I laughed at that until I learned that one cruiser had done exactly that, as well as nautical chart thank-you cards and a hose-clamp wedding ring! I decided to start with a leecloth as it’s a simple shape and doesn’t require the use of a sewing machine.
For anyone planning to do any overnight sailing, as we were, leecloths are a must. They can transform any berth or settee into a sea berth, holding you snugly in place so you don’t go flying when the boat suddenly lurches in the middle of the night. Sleep comes more easily, too, when your muscles aren’t working to hold you in place. A leecloth can also restrain large items stored in an unoccupied berth.
Leecloths can be made from canvas, ripstop nylon, mesh, or many other strong fabrics. You can buy them online for around $100 or have them custommade. However, using our old sailcloth, I made one for next to nothing. It was a great opportunity to practice working with sailcloth and sailmakers’ tools (see this post on what to have in your sail repair kit).
Materials
- Sailcloth (free!) – I had a discarded sail to use, but if I hadn’t, I probably could have obtained scrap cloth from a sailmaker.
- Webbing (around $5) – I didn’t have any old jacklines to recycle, but I found webbing for about 40 cents a foot at an outdoor store. We used approximately 16 feet in our 4-foot lengths.
- Grommets and punch (around $8) – I picked up a grommet kit (available at hardware stores) that included 3⁄8-inch brass grommets, a hole cutter, a base, and a flaring tool.
- Wood screws and washers ($1 to $2) – I used five #10 wood screws and five fender washers to fasten the base of the leecloth to the settee flat. (Machine screws with washers and locking nuts would also work.)
- Sailmaker’s supplies – To sew the webbing to the sailcloth I used waxed thread (waxed dental floss also works), a sailmaker’s needle, a leather palm, and glue (5200 Fast Cure, 3M 950 Seamstick tape, hot glue, and contact cement all adhere to Dacron). As I was sewing by hand, I used an awl to punch holes for the needle.
Total project cost: $15 to $20
Estimated time: 2 hours
Identifying the sea berth
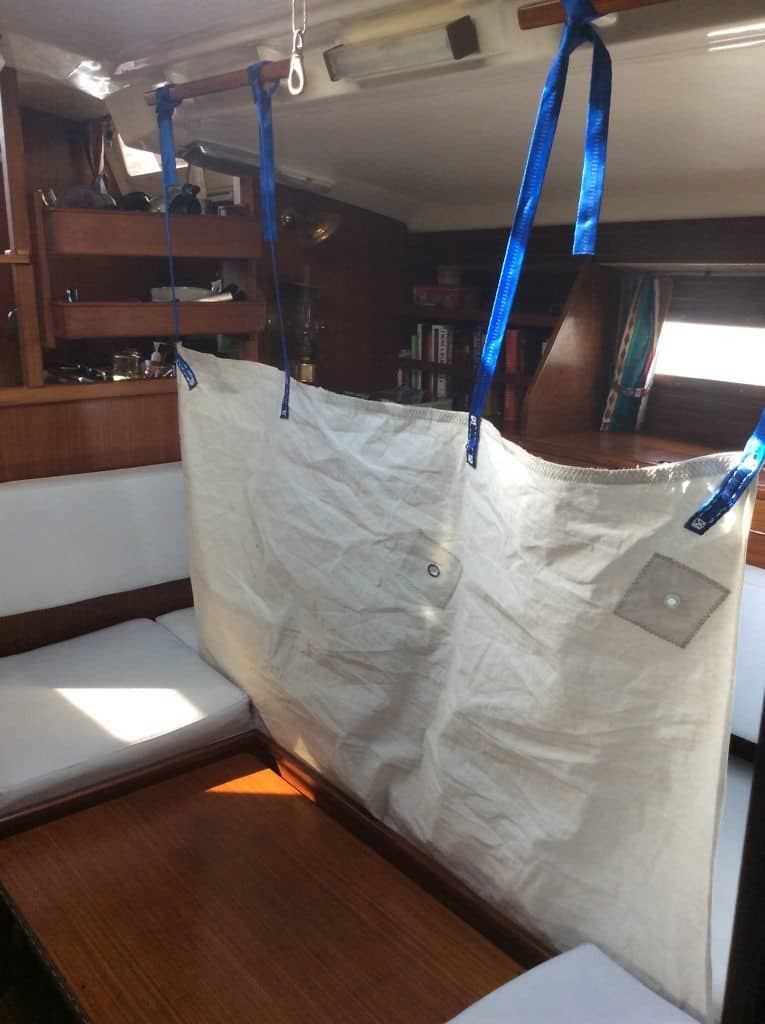
First, we had to decide where to put our leecloth. Generally speaking, the closer a berth is to the boat’s center of gravity, the more comfortable it will be under way. We chose our port settee as our primary sea berth because it’s in the middle of the boat and we could easily tether our leecloth to the handrail above it — no need to make more holes in the boat! Also, anyone under 6 feet could fit on it comfortably.
The pattern
A leecloth is essentially a big rectangle, so making a pattern was easy. When in use, it assumes an L-shape, with half of it secured under the seat cushion and, in our case, the other half leading vertically toward the handrail above the settee. My plan called for five grommets at the bottom, for securing it to the settee flat, and four straps along the top that we would tie to the handrail. (I’ve seen grommets along the top used to lace leecloth to handrails or dedicated eyes. I’ve also seen lines run through small webbing loops sewn to the leecloth and tied off to handrails.)
In measuring the length of our leecloth, I considered functionality. At a minimum, the sleeper should feel supported from the shoulders to below the knee. A longer leecloth that reaches head to toe creates privacy; a shorter leecloth makes getting in and out of the sea berth easier. We decided to go with a longer leecloth.
I removed the settee cushions and measured the height of the leecloth. It has to reach at least 2 feet above the cushion so the occupant won’t roll over the top. As I planned to attach the leecloth to the berth flat as far outboard as I could, I added to the height the width of the berth plus a couple of inches as an allowance for the leecloth to curve around the cushion. I ended up with a square about 6 x 6 feet. Had I planned to hem the edges, I would have added 3/4 inch all the way around for seam allowance.
Lastly, holding the leecloth in place, I determined where on the handrail I would tie the leecloth and measured the length of webbing I would need for each of the four straps, including a 4-inch overlap for sewing the webbing to the leecloth.
Marking and cutting
I laid out my sailcloth, measured and marked the four sides of the leecloth using a straightedge, then cut out the cloth. (That the leecloth has patches and other reminders of its previous life as a sail adds to its authenticity.) On another piece of cloth, I marked and cut out 10 2-inch-square patches that I later used to reinforce the five grommet locations.
Attaching the webbing
I marked the locations for the four straps along the top edge of the leecloth, one on each end and two equally spaced in between. At these marks, I overlapped 4 inches of the webbing onto the sailcloth, placing Seamstick tape between the cloth and webbing to hold them together.
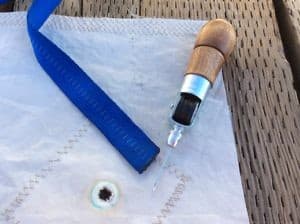

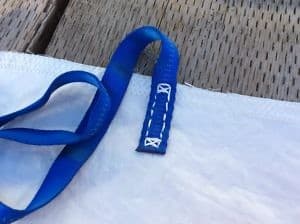
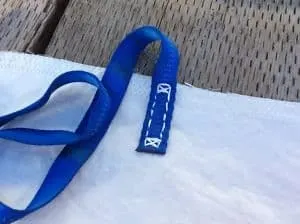
As I was stitching by hand, I used an awl to punch out a hole pattern with an X-box stitch at the bottom and top of the webbing and a straightstitch pattern up the sides. I stitched the pattern from top to bottom, then reversed and stitched the same pattern in the other direction.
So the stop-knots in the thread wouldn’t unravel, I melted them with a flame . . . and discovered how easily Dacron melts. Lesson learned. I cut two matching patches out of my remaining sailcloth and glued them on either side of the hole.
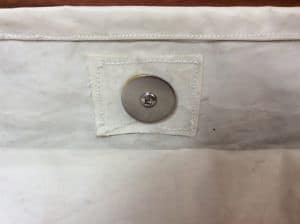
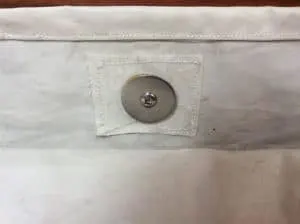
Setting the grommets
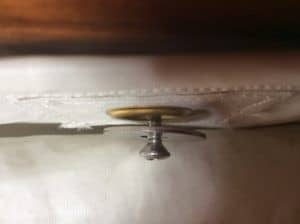
My plan was to fasten the leecloth to the settee with screws, so I installed five grommets along the bottom edge of the leecloth. With a pencil, I marked on the fabric the locations for the grommets, then glued my 2- x 2-inch reinforcement patches on both sides of the fabric, centered on the marks. I could have stitched around the borders of the patches had I thought I needed the added strength.
Once the glue was dry, I laid the cloth on a piece of scrap wood, aligned a hole punch in the center of a reinforcement patch, and gave it a good whack with the hammer. (I sometimes had to give it a second whack.) I then stacked the base, grommet, and flaring tool so the sailcloth was sandwiched between the two grommet halves and gave the flaring tool a good whack. In no time, I had a row of grommets.
Installing the leecloth
To mark the settee flat for the screws, I removed the seat and back cushions, laid the leecloth in position, and scribed through the grommets with a pencil. I drilled pilot holes, lined up the grommets over the holes, placed a fender washer on each screw, then drove the screws through the leecloth grommets and into the bunk board. The reason for attaching the leecloth all the way outboard is so the screws will be in shear, rather than simply relying on their threads to resist pulling out.

My leecloth was now installed. All that was left to do was to replace the settee cushions, tie the straps to the handrails, and step back to admire my work! To stow the leecloth, I fold it back on itself and tuck it beneath the seat cushion. After all that hard work, I deserved a nap. I took my leecloth for a test snooze to dream about my next project for recycled sailcloth . . . hatch covers, a cockpit shade, dropcloths for work areas . . .

Originally published in Good Old Boat Magazine 2016
If you enjoyed this article, be sure to check out this special subscription offer for Good Old Boat magazine, they have fantastic tips and DIY for your slightly aging sailboat!
Fiona McGlynn is an award-winning boating writer who created Waterborne as a place to learn about living aboard and traveling the world by sailboat. She has written for boating magazines including BoatUS, SAIL, Cruising World, and Good Old Boat. She’s also a contributing editor at Good Old Boat and BoatUS Magazine. In 2017, Fiona and her husband completed a 3-year, 13,000-mile voyage from Vancouver to Mexico to Australia on their 35-foot sailboat.
Jim and Barbara Shell
Friday 5th of May 2017
Nice job, well thought out. Good to see a use for leftover sailcloth.
Fiona
Monday 29th of May 2017
Thanks Jim and Barbara! We certainly love sail cloth. So useful on the boat.