
Build your own sailboat solar arch or radar arch for a fraction of the price.
We were outfitting our 1979 Dufour 35 for a multi-year sailing trip and had decided to install a 400-watt solar array. But how to best mount them?
A structural arch made the most sense, and we didn’t have one. After a couple of quotes over $5000 USD for a ‘simple arch,’ we decided that we would have to build our own.
We sought opinions around the docks and almost universally received the advice, ‘Don’t do it…just don’t.’
But, being young and foolish we decided to try it anyway; what did we really have to lose? While it was more difficult than I had anticipated, we ended up with a product with we were quite happy with and it only cost us a little more than $200 USD.
Note: A version of this article was published in Good Old Boat Magazine

What is the purpose of a sailboat arch?
Structural arches, also commonly referred to as solar, stern, or radar arches, are a common feature of coastal cruising and bluewater sailboats.
They are used for a variety of purposes, but most commonly to mount and support:
- Solar panels
- A wind generator
- A radar radome
- A weather station
- Various communications antennae
- A dinghy davit, for raising and lowering the dinghy
What do sailboat solar arches cost?
While they provide many advantages, arches can often be prohibitively expensive (commonly from 5k – 12k); but with a little sweat equity, limited metal working skill, and some careful measurements there is no reason why you can’t build your own sturdy arch for a fraction of the normal cost.

Customizing your solar arch
There are as many shapes and sizes of structural arches as there are sailboats. Determining the style of an arch for your sailboat will depend on a variety of factors, primarily; aesthetics, cost, and function.
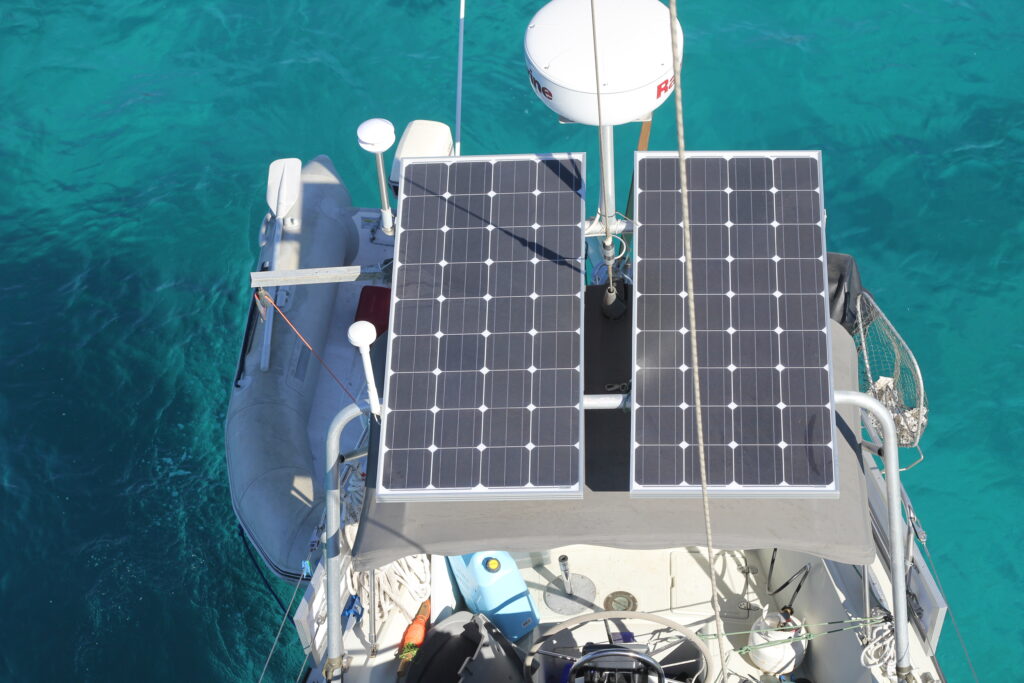
This article details my experience designing, fabricating, and installing a simple, aluminum arch that I use for solar panels, radar, AIS antenna, and a weather station, not to mention a hundred other small things.
The principles of design and fabrication are common to a wide variety of arches and can likely be used as the basis for other who want to modify the design to fit their own needs and boat shape.
I provide very little engineering guidance below and I recommend that readers creating their own arches first pass their design by a structural engineer or someone knowledgeable in structural design.
Materials
There are three main types of material from which to construct an arch; stainless steel, aluminum, and fiberglass.
There are a variety of factors that go into material selection, with the most common being; aesthetics, price, strength, and ease of construction. I made a subjective traffic light comparison of the different materials, to assist our decision-making process.
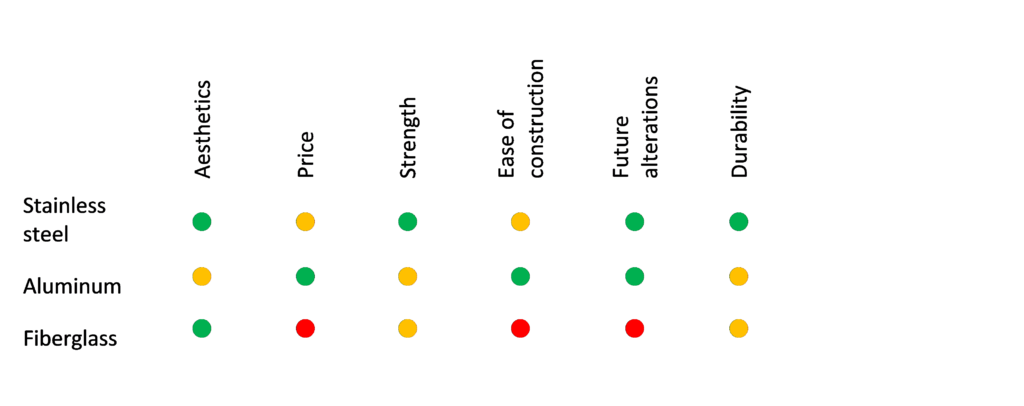
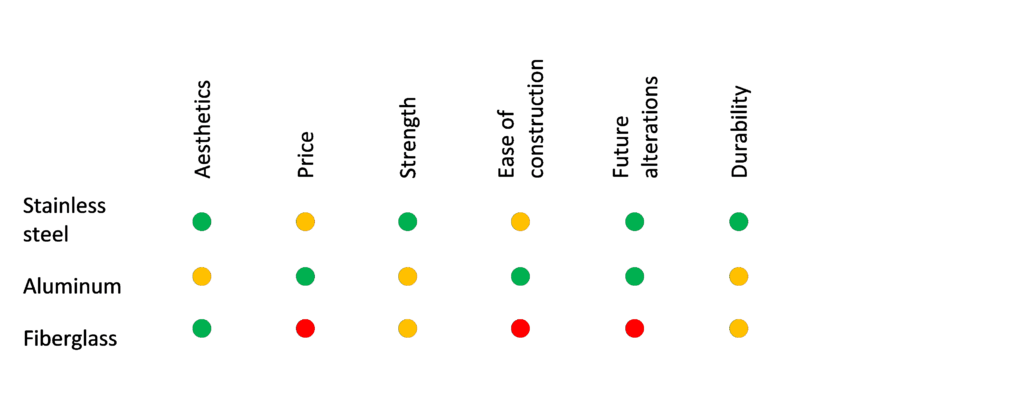
Stainless steel and aluminum compared closely for our needs, but as our chief concerns were price and ease of construction we opted to go with aluminum.
There are many different grades of aluminum and it is important to select one that will stand up to the marine environment.
We selected aluminum alloy 5052. It is a medium-strength aluminum alloy with good ductility and excellent corrosion resistance and for the latter reason is often preferred for marine environments.
High-grade aluminum cannot be easily found in conventional building supply stores like Home Depot.
Purchasing metal from a wholesaler, such as Metal Supermarket or Metals Depot, is much cheaper than buying from a local welder or manufacturer. A simple google search will supply you with the options for metal wholesalers in your area.
We purchased our raw materials for the arch for around $70 USD.
In addition to the aluminum tubing, we required the same type of aluminum in flat-stock and stainless steel bolts and lock-nuts to fasten the frame together and to secure it to the deck of the boat.
I made all the required cuts with a hack-saw and jigsaw, though a metal cutting blade on a radial arm saw or circular saw would have worked as well.
I cleaned up the cut edges and any sharp spots with a 5” angle grinder with a grinding disc made for aluminum. A titanium-coated drill bit was used to make the bolt holes.
| What you’ll need: – aluminum alloy 5052 tubing to length (1.5”dia. x 0.145”and 1”dia. x 0.125”) – stainless steel hardware (12 x 1.5” x 5/16” bolts, 4 x 1” x 5/16” bolts, 8 x 2” x 5/16” bolts, 24 x 5/16” nylock nuts) – 2’ x 4’ x 1/4” aluminum alloy 5052 flat-stock – hack saw or other metal cutting saw – angle grinder – drill |
Design

Determining the shape
Once the material was selected we had to decide on a shape. We wanted as simple and robust a shape as possible.
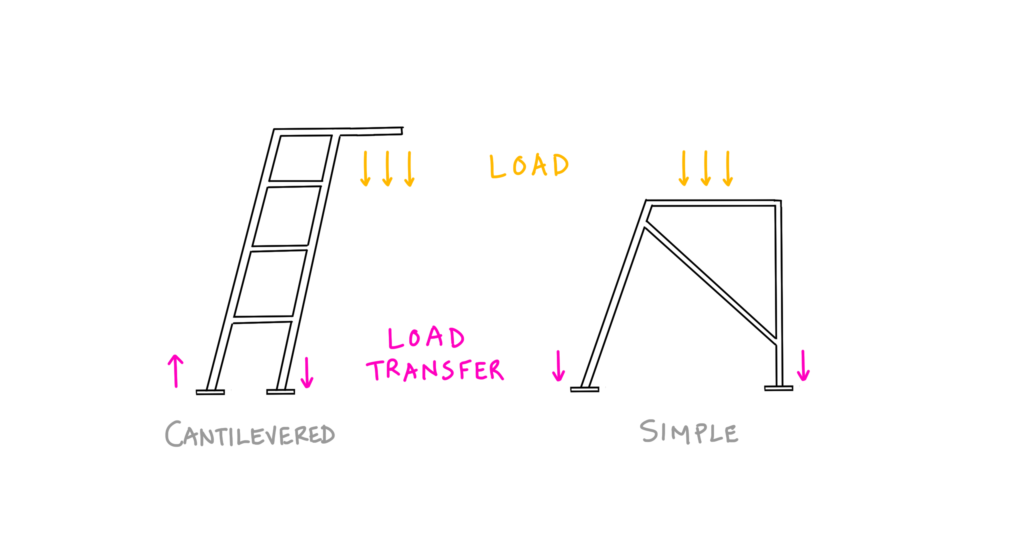
Many arches have a form that cantilevers over the transom of the boat. While the aesthetic is nice, the primary function of this shape is to support dinghy davits. Due to its cantilevered nature, it imparts a constant rotational force on the attachment locations.
We have a wind vane on the back of our boat, so hoisting the dinghy was out of the question. We opted for a simpler shape that transfers load straight down, thereby reducing stress on attachment locations.
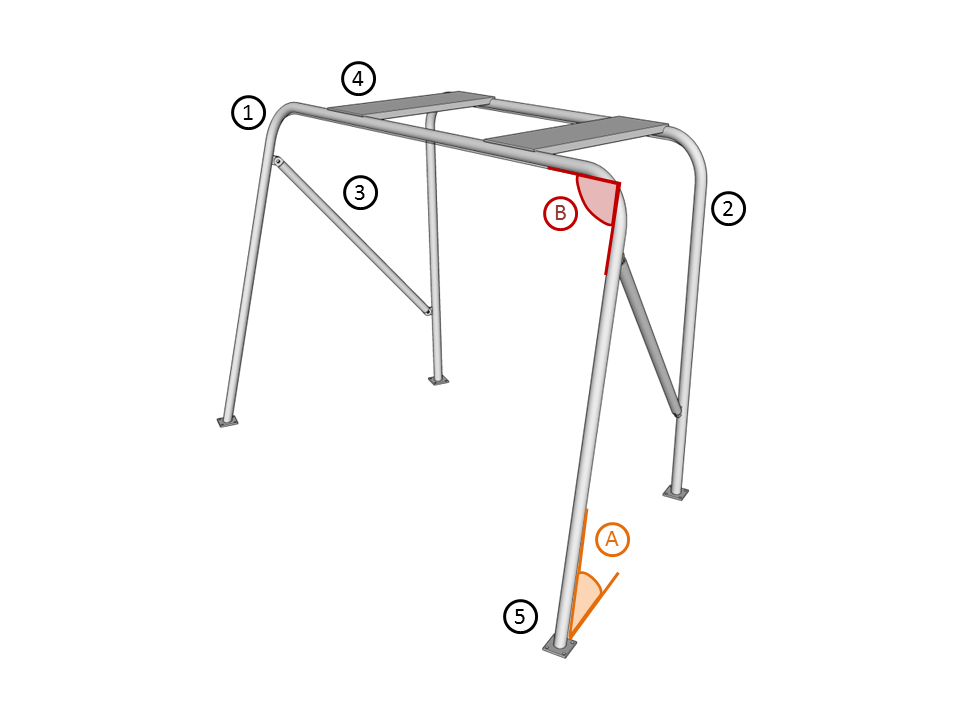
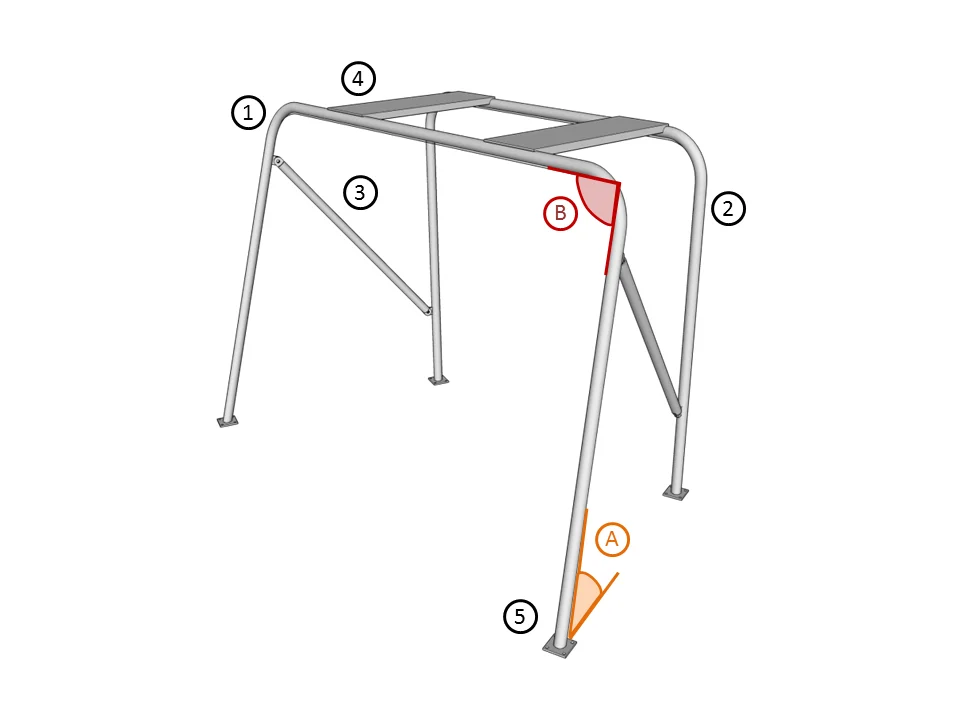
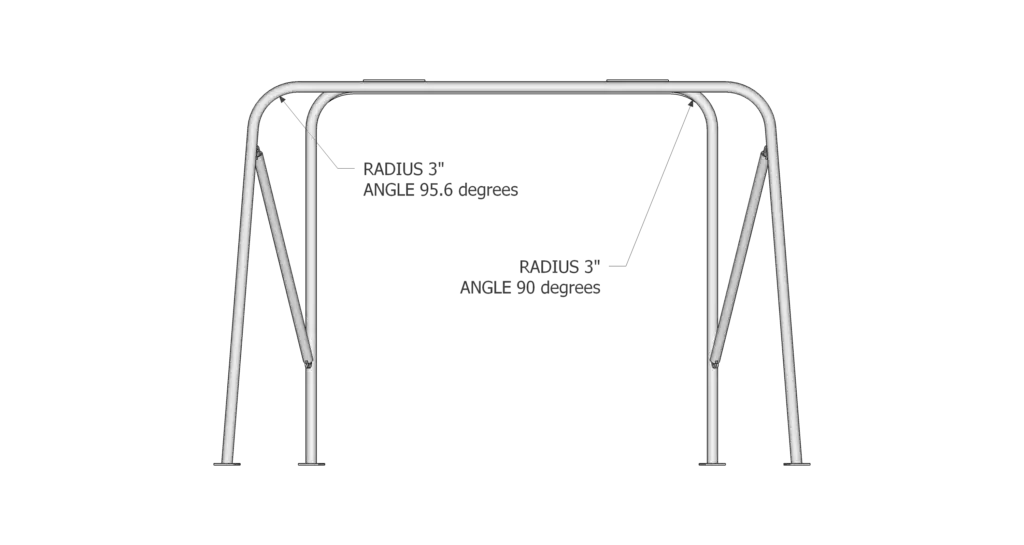
The arch design makes use of a forward tube (1) and an aft tube (2) with two bends in each tube. A tube connecting the aft and forward tubes at an angle creates a cross brace (3), resisting lateral force fore and aft and distributing dead load.
Two pieces of flat-stock aluminum (4) bolted on top of the forward and aft tubes also provide lateral resistance and further rigidity to the frame.
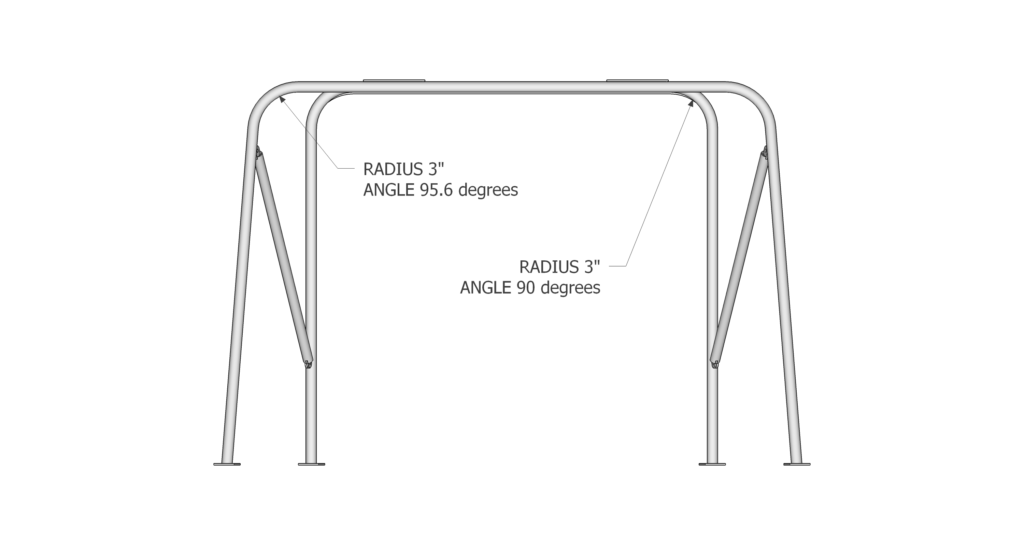
The 3” radius bends in the tubes resist lateral forces from the sides.
Four ¼” thick, 3” square plates (5) were cut from flat stock and welded to the ends of the tubes. These plates were bolted through the deck to matching plates on the other side.
| Things to consider: – solar panel dimensions – boom swing height and radius – windvane swing height and radius – obstruction to getting on and off the boat, especially at head height – antennae or radome interference |
Calculating the tube bends
After measuring everything out to ensure no obstruction, the next step was determining the slope angle (A) of the forward tube. The slope of the tube would give the arch a sleeker look and improve access on and off the boat.
Wherever possible it is nice to create parallel lines as too many intersecting lines can be displeasing to the eye, so I maintained the same slope as the pushpit.
The slope of the forward tube (A) also determines the angle (B) at which the tube will be bent in order to keep the sides of the arch in one plane and in line with the sides of the boat.
There are three ways to calculate the angle of bend (B) in the forward tube:
The first requires some complex trigonometry for which I created a calculator in Excel, which requires only the dimensions of the arch as inputs.
Another option is to use a free CAD (computer-assisted drawing) program such as Trimble SketchUp and draw the arch you want to build using the measurements you took from the boat. If using CAD, it is a simple process to measure the angle of the bend with the protractor tool.
Lastly, you can construct the arch out of a practice material such as PVC pipe or doweling and physically measure the angles and dimensions. This option also provides the chance to see how the arch interacts with other components of the boat.
Tube bending
Bending the tubing can be done for a low cost at home. It is possible to rent a tube bender from a building supply store for $50 USD per day or purchase a hydraulic tube bender for around $100-150 USD.
We ended up renting a tube bender and found the process quite easy.
We were advised by a tube bending company (Aggressive Tube Bending) to select tubing with a 1.5” outer diameter and a 0.145” wall as it didn’t require annealing (heating and slowly cooling) to bend to a 3” radius, whereas 2” tubing would have required annealing.
It is a good idea to contact a metal shop or tube bending company to ensure that your design can be fabricated without special equipment or techniques.
Usually, these questions can be answered quickly and over the phone and do not incur a consulting fee.
Installation
Dry-fit preinstallation
My recommendation would be to dry-fit everything prior to any welding.
It takes a little extra time to assemble and dry-install the arch, only to disassemble it again, but the time saved in having to cut welds or modify a finished product is well worth it.
We designed and installed our arch while dry-docked in a boatyard. We tried to keep the solar panels parallel to the waterline, but when the boat went back in the water, due to weight redistribution, the panels ended up angled slightly forward.
It is a good idea to fit the arch on a calm day at the dock, rather than guess how the boat sits in the water.
Measure and cut the tubes
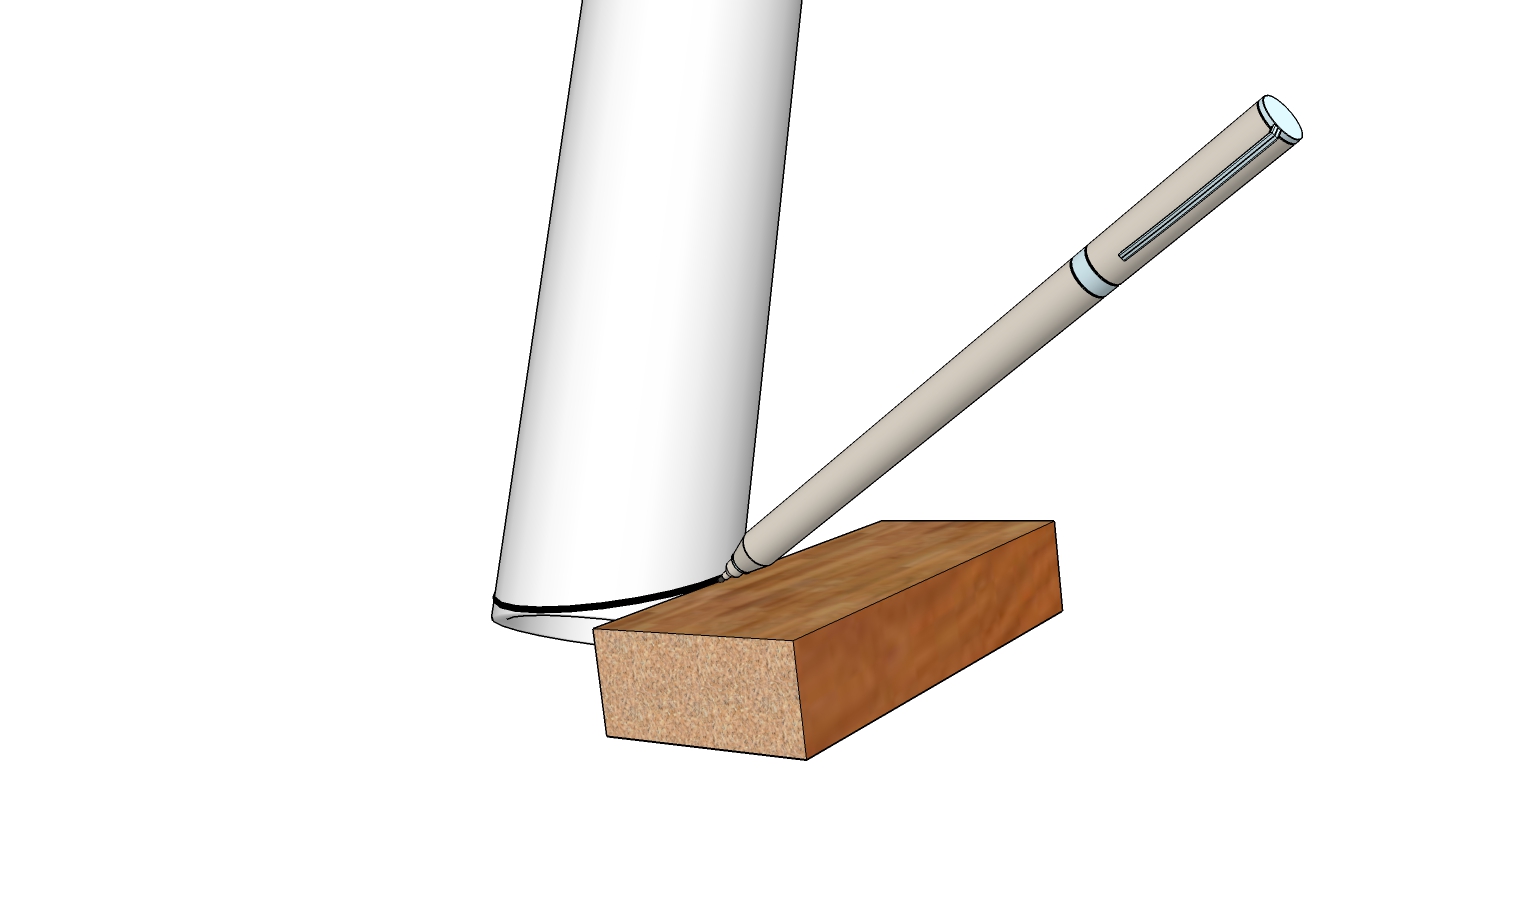
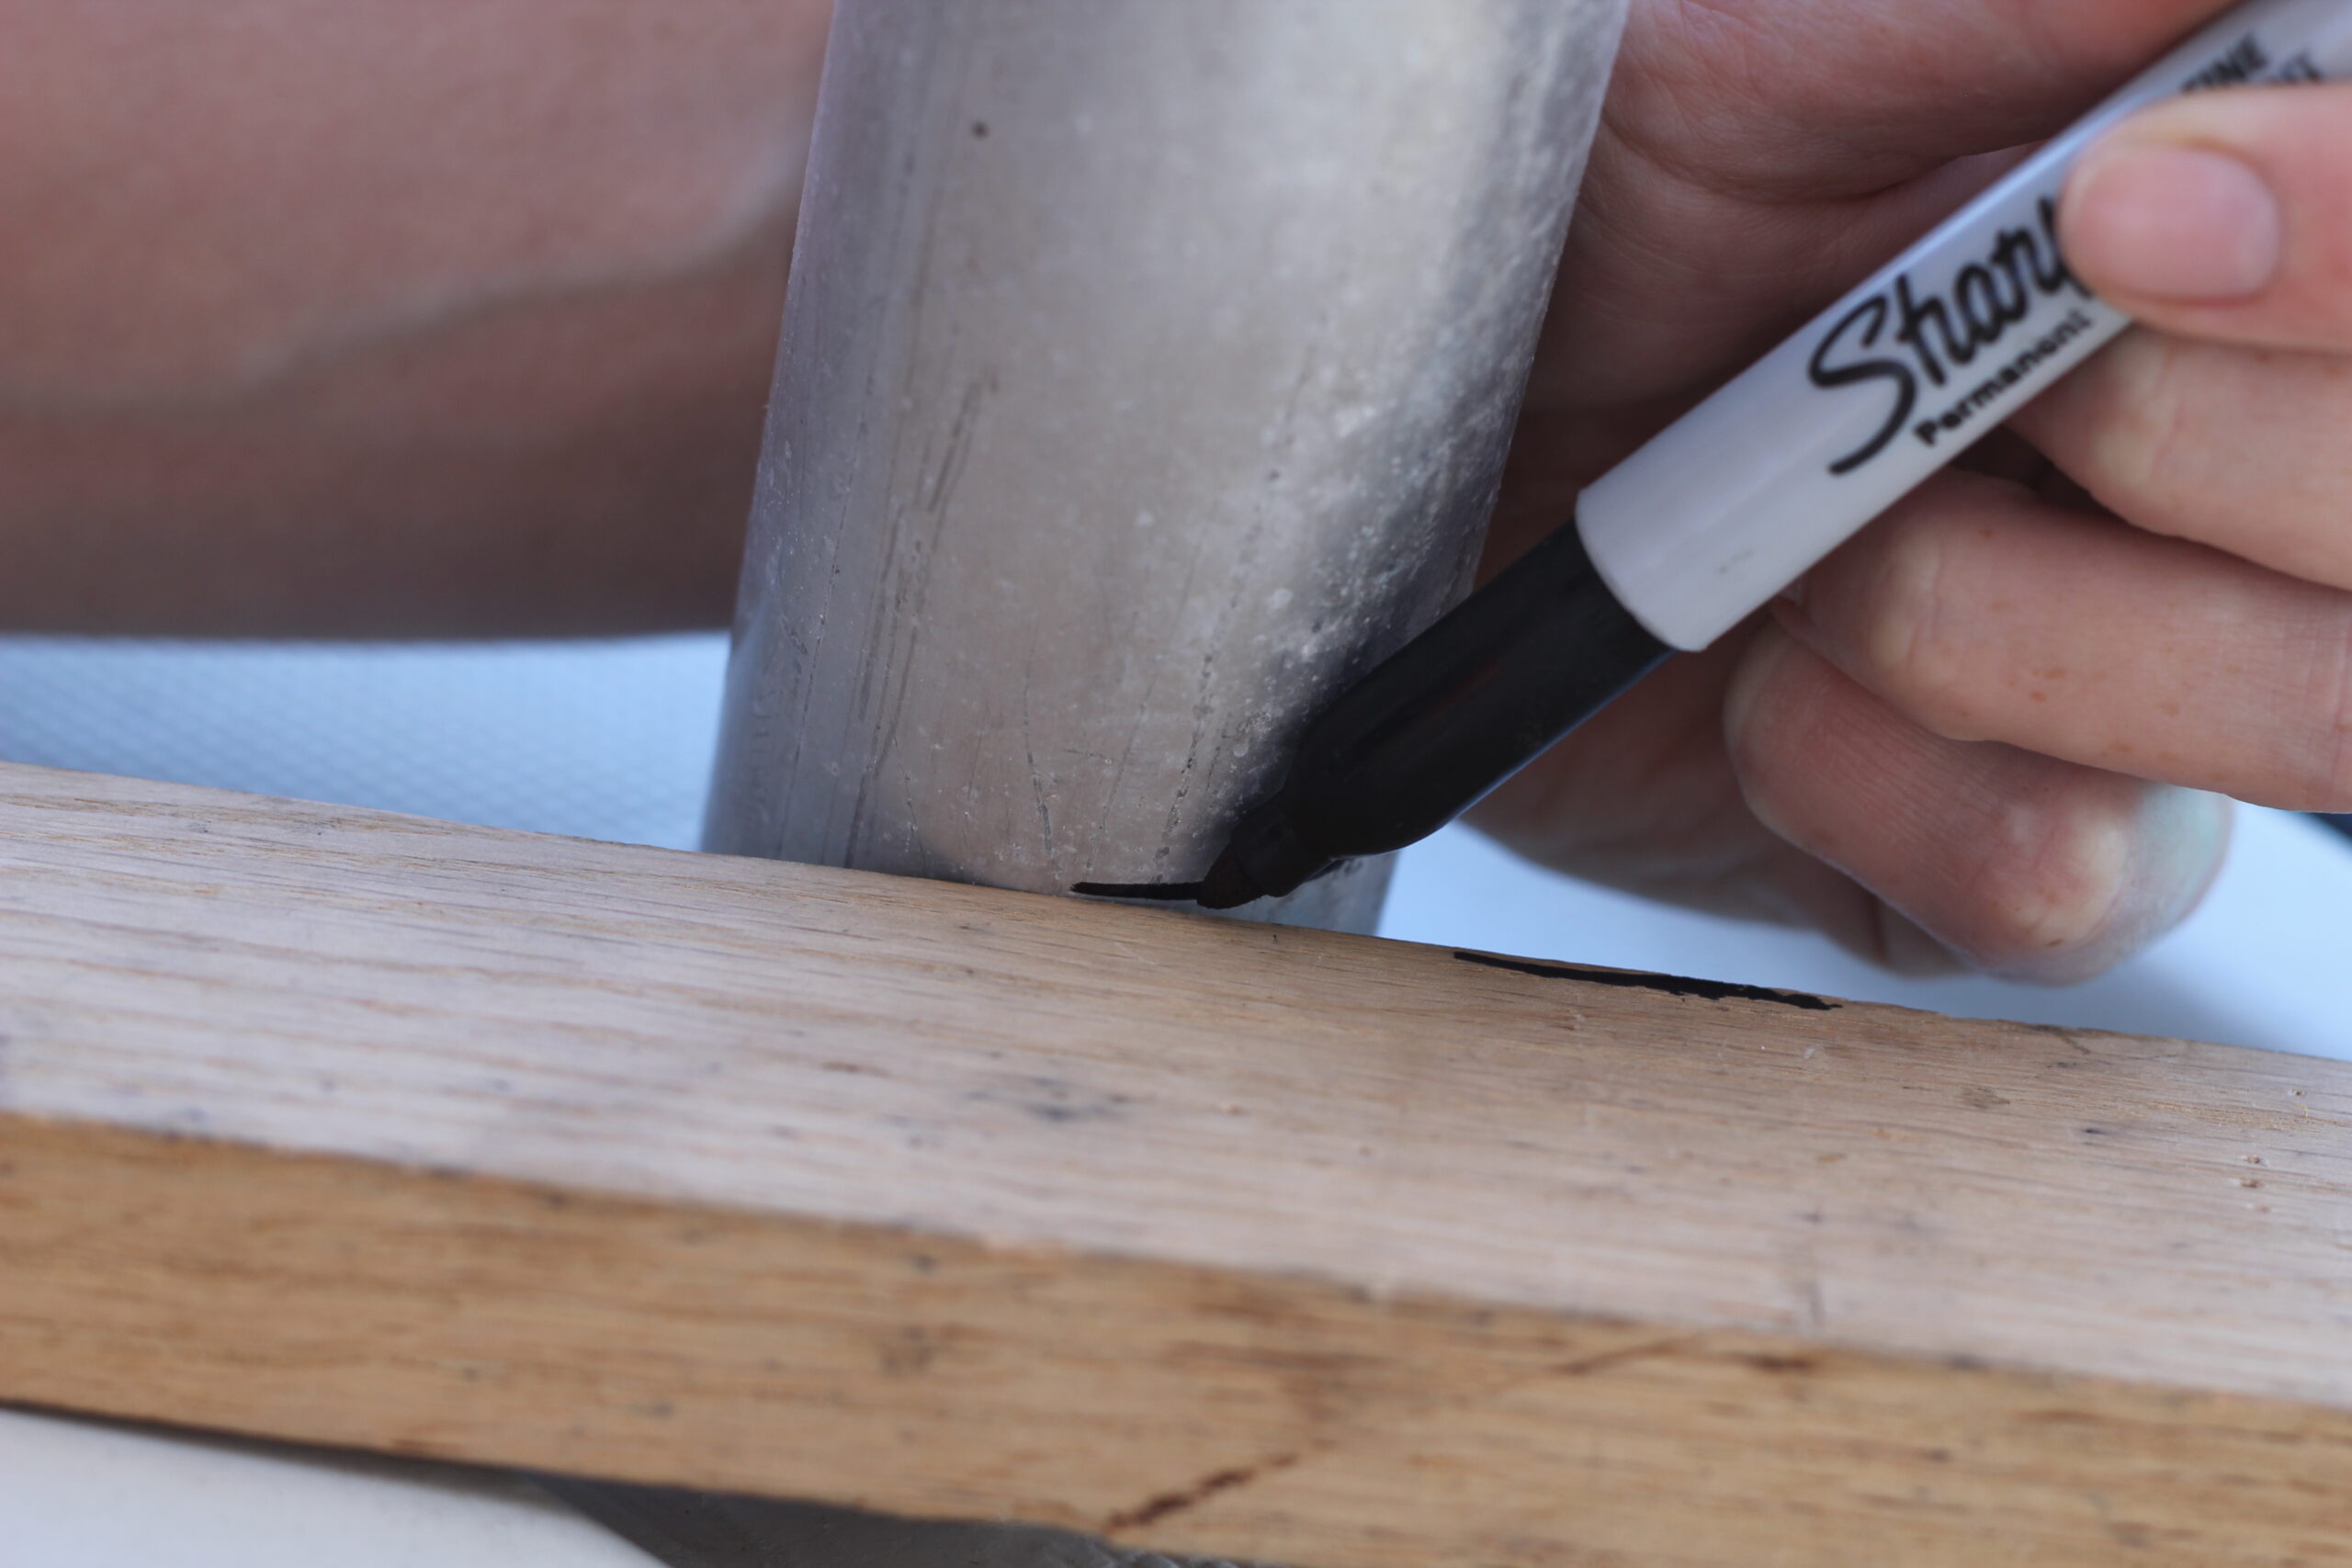
The most difficult process of the whole job was transferring the angle of the deck to the bottom of the tubes to ensure that the base plates would be flush when mounted. Because the deck slopes in two directions it would be impossible to assume an angle at which to cut.
The solution we devised was using a piece of ½” wood and tracing around the tube with an indelible marker (see image below).
We first made the tubes as secure as possible in the locations they would be when they are bolted to the deck. This required installing the flat stock between them and lashing them to as many points on the deck as we could find.
The bottom of the tubes rested on the deck. We used a 3/8” thick, block of wood, which was placed flat on the deck, as a guide and traced a line around each tube.
The line transferred the correct angle of the deck to the tubes. I made the cuts with a hack saw and cleaned them up with an angle grinder.
Weld base plates and attachment tabs
We hired an aluminum welder to weld 3”X3”X1/4” plates to the tubes that would be used to connect the arch to the deck of the boat.
When fitting the base plates to the tubing, trace the shape of the tube onto the baseplate to ensure the orientation of the plate is maintained.
We also welded tabs to the fore and aft tubes and corresponding tabs to the ends of the cross-brace tubes. The length of the cross-brace tube must be exact to connect to the attachment tabs on the fore and aft tubes, so careful measurements are required.

Install the fore and aft tubes
We bolted the fore and aft tubes to the deck prior to bolting together the rest of the frame.
We had planned to run the electrical cables for antennae and the radome through the tubes so we drilled 1” diameter holes in the base plates and through the deck where the base plates would be attached.
The 1” diameter hole will accommodate most electrical connectors. You may also want to install a ‘messenger line,’ which can be used to pull the cables through the frame after the arch is installed.
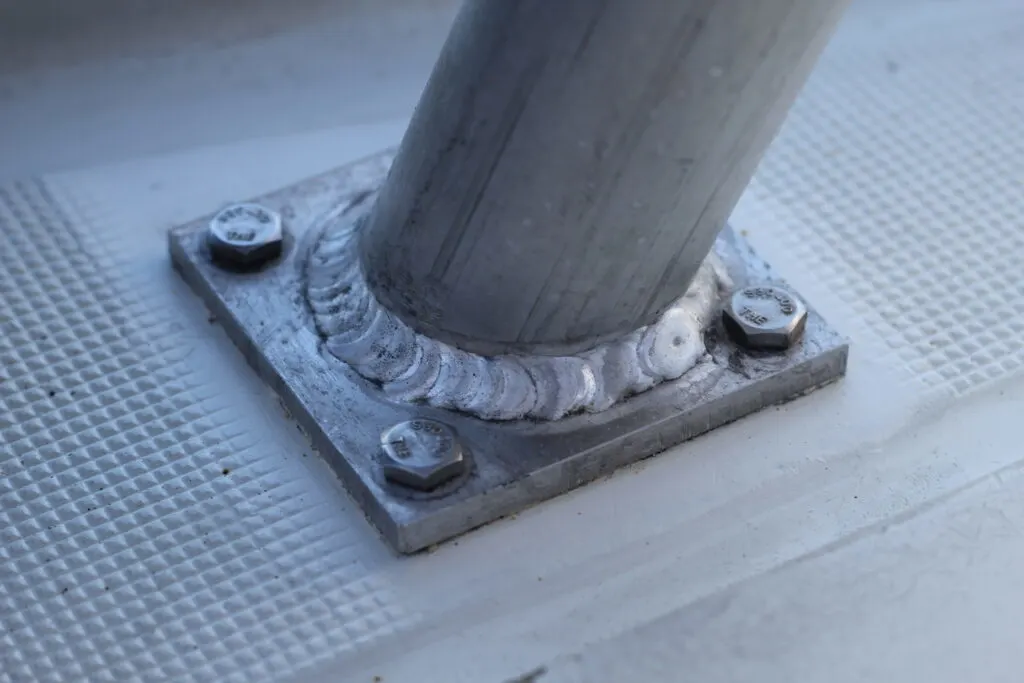
We applied Sikaflex 291 to the entire underside of the base plate immediately prior to installation to ensure a water-tight connection between the base plates and the deck.
The base plates were secured with 1.5” x 5/16” stainless steel bolts that connected to corresponding plates on the underside of the deck.
If there is not enough room for a plate on the underside, you can double up oversized stainless steel washers to meet the pull-out resistance requirements.
Stainless steel will react to aluminum and cause corrosion of the aluminum. A simple way to avoid this is to apply lanolin (we used Lanocote) to the stainless steel bolts to insulate them from the aluminum.

Bolt the frame together
Next we attached the cross-brace tubes. There will be a little flex in the frame, which provides some allowance for connecting the cross braces.
After securing the cross-brace tubes with stainless steel bolts, we installed the 1/4” flat stock to the tops of the tubes.
We had previously cut the flat stock into two 8” wide strips. If you are concerned about rigidity you can bend a 90-degree angle into the length of the flat-stock, though over a 3’ length, the deflection of unbent flat-stock will be minimal.
Finishing
To improve corrosion resistance and the aesthetic appearance of the arch, the various pieces, now that they have been welded, can be anodized or painted.
Anodizing requires submersion in a shallow electrolytic bath, so the arch must be in its disassembled form in order to be anodized. We received a quote for $150 USD to anodize the arch in any color we wanted.
Another option is to have the arch powder coated. We received a quote of $100 to paint it white or black.
In the end, we opted to do nothing as we don’t mind the dull silver look of the aluminum and were still penny-pinching.
In retrospect, we wish we’d had the arch anodized bright orange, but we were in a rush and focused on keeping costs to a minimum.

Conclusion
| Project Cost: Materials (aluminum and stainless steel) – $79.27 USD Welding – $112.50 USD Sikaflex 291 (1 tube) – $11.95 USD Total: $203.72 + tax |
The arch has not only been extremely useful for its intended purpose but also become invaluable for the various add-ons that we could never have foreseen.
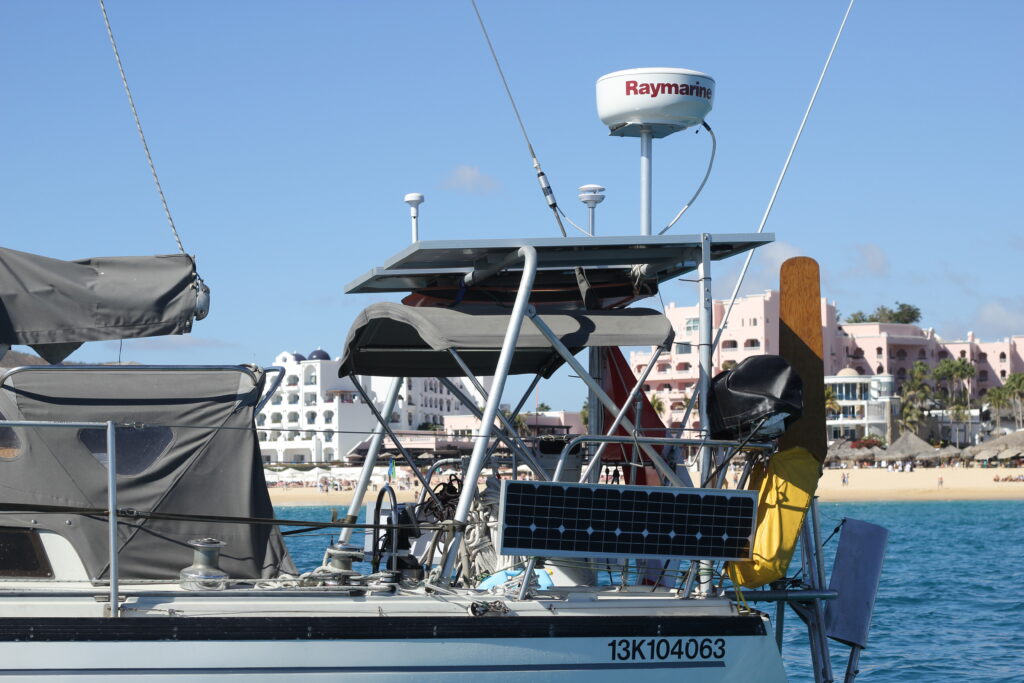
In addition to being a mount for solar panels, radome, communications antennae, and the weather station, an arch is also a place that supports or provides attachment points for:
- the outboard fuel tank and outboard lifting tackle
- fishing rod holders and a fish cleaning station
- the stern anchor
- furling line and boom brake attachment points
- boogie board storage
It also adds to the sense of security in the cockpit and is a great handhold in rolling conditions. It was a lot of work, but in the end, only costs us $200 USD and we can no longer imagine our little boat without it.
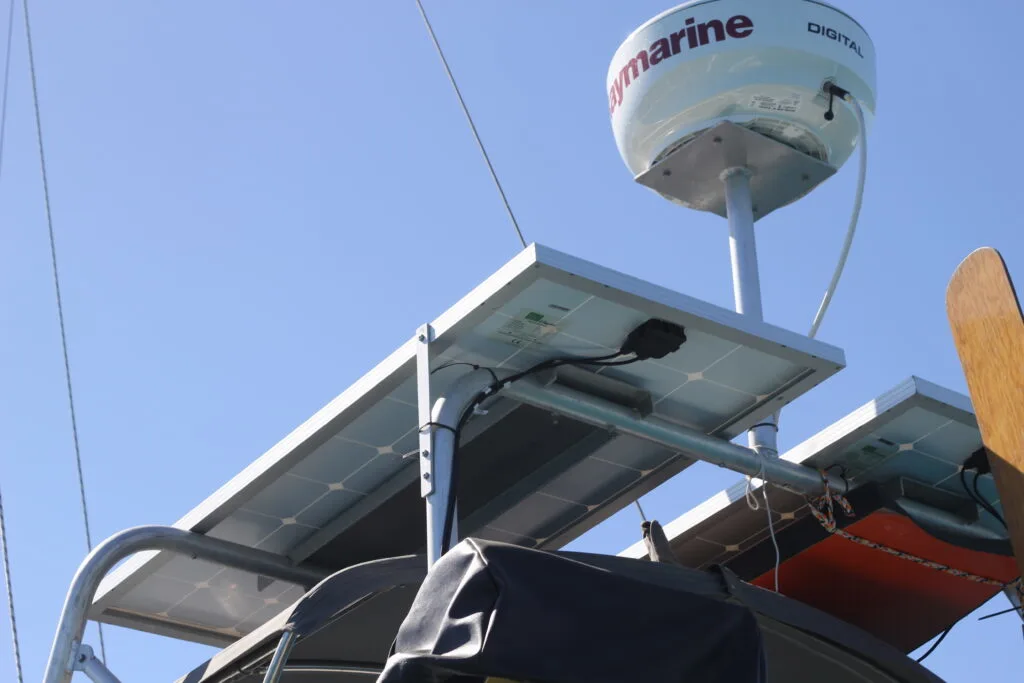
*Note: We installed our radome directly over the solar panels, which was a bad idea as it shades a small portion of the panels most of the time, greatly reducing solar output. I would recommend installing the arch on an extension away from the solar panels so that the noon-day sun is unobstructed, or even better, installing the radome on the mast.
Fiona McGlynn is an award-winning boating writer who created Waterborne as a place to learn about living aboard and traveling the world by sailboat. She has written for boating magazines including BoatUS, SAIL, Cruising World, and Good Old Boat. She’s also a contributing editor at Good Old Boat and BoatUS Magazine. In 2017, Fiona and her husband completed a 3-year, 13,000-mile voyage from Vancouver to Mexico to Australia on their 35-foot sailboat.